
I live in a little big town and my nearest Hobby Lobby is about 60 miles away. So when I went to buy the black ornate frame that has always been there and they did not have it… I decided to make do as crafters do and this is what I did. With that being said… You might find a super cool ornate 5 X 7 frame at the thrift store and be able to follow these steps and get a super cool effect using this tutorial.
MATERIALS:
- 5 x 7 Frame
- Black Spray Paint – optional
- Sticky Mounting Board
- Hot Glue Gun
- Your Stitched Piece
- Here is a link to my Beetlejuice Inspired Free Cross Stitch Pattern
INSTRUCTIONS:
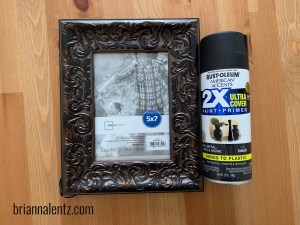
- I bought this $4 5 X 7 Frame and $4 Matte Black Spray Paint at Wal Mart. I already had sticky board in my stash and hot glue gun was hot.
-
- The day before you want to complete your project you will want to spray paint your frame. Here is a video where I show you how I spray painted mine.
- With the frame fully dry, make sure your stitched work is cut down and completely ironed.

- Mount your cross stitch piece to your sticky board.

- I used fabric chalk to give me a ball park idea of where to mount it because I was sort of doing it blind.

- Next, flip your mounted piece over and hot glue the fabric down.

- Place in frame, cinch it down and you are done.

This honestly took 2 hours the day before to spray paint, and then 10 minutes the next day to actually fully finish. And I personally think it looks super rad.